This article describes the infrastructure changes that you have to apply when you want to deploy a rendering host app into the Sitecore Managed Cloud containers environment.
The following steps need to be done to add a node.js based rendering host to Sitecore Managed Cloud:
- Prepare the Docker files
- Push the images to the Azure Container Registry (ACR)
- Define the Rendering host configuration files
- Create Rendering Host configuration overlays
- Add the image in the Application repository
- Register a domain name
- Extend the Front Door configuration
- Configure Ingress
- Enable the Rendering Host component
- Apply the changes
Prepare the Docker files
Refer to the Running node.js based rendering host in AKS guide for instructions on how to build corresponding custom images.
Push the images to the Azure Container Registry (ACR)
To push the images to the ACR:
- In PowerShell, execute the docker push command. You must push all images to the pre-provisioned ACR: {infrastructure_id}acr. Also, you can configure your Azure DevOps to push images in Sitecore Managed Cloud ACR.
Define the Rendering host configuration files
To create the Rendering configuration files:
1. Navigate locally to the Application repository folder and create a folder with the following path:
Roles\sitecore-{topology}\bases\components\rendering
2. Create the following Rendering Host configuration files into the folder that you created earlier:
- rendering.yaml, with the following content:
| apiVersion: v1 kind: Service metadata: name: rendering spec: selector: app: rendering ports: - protocol: TCP port: 80 --- apiVersion: apps/v1 kind: Deployment metadata: name: rendering labels: app: rendering spec: replicas: 1 selector: matchLabels: app: rendering template: metadata: labels: app: rendering spec: nodeSelector: kubernetes.io/os: windows containers: - name: demo-rendering image: demo-rendering ports: - containerPort: 80 imagePullPolicy: Always env: - name: SITECORE_API_HOST value: http://cd - name: NEXTJS_DIST_DIR value: .next - name: PORT value: '80' imagePullSecrets: - name: regcred |
- kustomization.yaml:
|
apiVersion: kustomize.config.k8s.io/v1alpha1 |
Create Rendering Host configuration overlays
To integrate any module configuration with the Managed Cloud Containers environment, you must define an overlay layer on top of the base configuration added above. It will simplify the upgrade process in the future as well as it is a good kubernetes practice in general.
To define the overlays:
1. Create the roles\sitecore-{topology}\overlays\components\rendering\cm.yaml file with the following content:
|
--- |
2. Create the roles\sitecore-{topology}\overlays\components\rendering\rendering.yaml file with the following content:
|
--- |
3. Create the roles\sitecore-{topology}\overlays\components\rendering\kustomization.yaml file with the following content:
|
--- - rendering.yaml |
4. To execute the overlays, navigate to roles\sitecore-{topology}\tasks\main.yaml and add the following:
|
- name: Copy Sitecore roles configuration into Rendering Host overlay |
Add the image in the Application repository
Now you need to add the rendering host image to the Application repository.
To change the images in the Application repository navigate to config/docker-images and edit the docker-images.json file as follows:
-
Add the rendering property, and point it to the rendering image that we have pushed to the ACR on earlier steps.
For Sitecore XM, docker-images.json will look like below:
| { "sitecore": { "cm": "{infrastructure-id}.azurecr.io/xm1-cm:20221109.3-1.0.0", "cd": "{infrastructure-id}.azurecr.io/xm1-cd:20221109.3-1.0.0", "id": "{infrastructure-id}.azurecr.io/id6:20221109.3-1.0.0", "rendering": "{infrastructure-id}.azurecr.io/rendering:20221031.4", "mssql_init": "{infrastructure-id}.azurecr.io/xm1-mssql-init:latest", "solr_init": "{infrastructure-id}.azurecr.io/xm1-solr-init:latest" }, "external": { "windowsservercore": "mcr.microsoft.com/powershell:lts-windowsservercore-1809" } } |
Register a domain name
Because Rendering Host is a publicly available service, you must register a domain name for it.
To register a domain name:
1. Navigate to the portal where your DNS name is managed from.
2. Create an additional CNAME record for Rendering Host that points to Azure Front Door: {infrastructure_id}fdr.azurefd.net,
where infrastructureId is your environment identifier that starts with mcc.
3. Navigate to the Azure Portal and create a secret within the Key Vault for the environment:
-
Secret name - sitecore-rendering-host-name
-
Secret value - the Rendering Host hostname that you created in the previous step.
Extend the Front Door configuration
You must extend the Front Door configuration with an additional public-facing service name.
To extend the Front Door configuration:
1. Navigate locally to the Application repository folder.
Open to edit the frontdoor\backend-config.json and define the rendering back-end config:
| { "name": "rendering-ingress", "probe_path": "/api/healthz", "backend_list": [ { "host_header": "rendering.sitecore" } ] } |
2. Navigate to frontdoor\main.tf and in the locals section, add a new variable to "sitecore_rendering_host_name“:
| sitecore_rendering_host_name = data.azurerm_key_vault_secret.sitecore_rendering_host_name.value |
and
| sitecore_rendering_frontend_endpoint_name = replace("${local.sitecore_rendering_host_name}-endpoint", ".", "-") |
3. Define the data resource to retrieve the Horizon host name from the Key Vault:
| data "azurerm_key_vault_secret" "sitecore_rendering_host_name" { name = "sitecore-rendering-host-name" key_vault_id = data.azurerm_key_vault.this.id } |
4. In the "azurerm_frontdoor" resource, define an additional routing_rule:
| routing_rule { name = "HTTPS-rendering" accepted_protocols = ["Https"] patterns_to_match = ["/*"] frontend_endpoints = [local.sitecore_rendering_frontend_endpoint_name] forwarding_configuration { forwarding_protocol = "MatchRequest" backend_pool_name = "rendering-ingress" } } |
5. In the "azurerm_frontdoor" resource, define the frontend_endpoint:
| frontend_endpoint { name = local.sitecore_rendering_frontend_endpoint_name host_name = local.sitecore_rendering_host_name web_application_firewall_policy_link_id = azurerm_frontdoor_firewall_policy.front.id } |
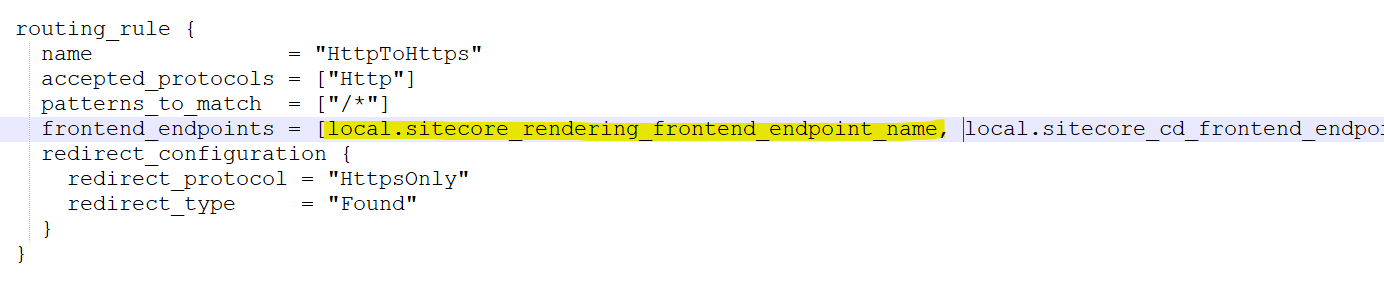
6. Adjust HttpToHttps so that it covers the HTTPS-rendering routing rule:
7. You must now apply the changes with a pull request to the Infrastructure repository before you can continue with the next steps.
8. Run the FrontDoor pipeline to apply the changes and wait until the pipeline is executed successfully.
Define the “azurerm_frontdoor_custom_https_configuration” resource:
| resource "azurerm_frontdoor_custom_https_configuration" "rendering_host_https_configuration" { frontend_endpoint_id = azurerm_frontdoor.this.frontend_endpoints[local.sitecore_rendering_frontend_endpoint_name] custom_https_provisioning_enabled = true custom_https_configuration { certificate_source = "AzureKeyVault" azure_key_vault_certificate_secret_name = data.azurerm_key_vault_certificate.sitecore_ingress_certificate.name azure_key_vault_certificate_vault_id = data.azurerm_key_vault.this.id azure_key_vault_certificate_secret_version = data.azurerm_key_vault_certificate.sitecore_ingress_certificate.version } depends_on = [azurerm_frontdoor.this] } |
9. Apply the changes to the environment with a pull request to the infrastructure repository.
10. Run the FrontDoor pipeline to apply the changes and wait until the pipeline is executed successfully.
Configure Ingress
Next you must define and apply the Ingress configuration and define the secrets.
To configure Ingress:
1. In the Application repository, navigate to the roles\sitecore-{topology}\templates\ folder and create the ingress-rendering.yaml file with the following content:
| --- kind: Service apiVersion: v1 metadata: name: rendering-external spec: type: ExternalName externalName: rendering.{{ solution_id }}.svc.cluster.local ports: - port: 80 --- apiVersion: networking.k8s.io/v1 kind: Ingress metadata: name: sitecore-rendering-ingress annotations: kubernetes.io/ingress.class: "nginx" nginx.ingress.kubernetes.io/force-ssl-redirect: "false" nginx.ingress.kubernetes.io/rewrite-target: / nginx.ingress.kubernetes.io/proxy-buffering: "on" nginx.ingress.kubernetes.io/proxy-buffers-number: "4" nginx.ingress.kubernetes.io/proxy-buffer-size: "256k" spec: rules: - host: "rendering.sitecore" http: paths: - path: / pathType: Prefix backend: service: name: rendering-external port: number: 80 |
2. To define secrets, navigate to roles\sitecore-{topology}\templates\secrets.yaml and define the sitecore-rendering-host-name secret with sitecore-secret-provider. Extend the sitecore-hostname secret:
|
- key: rendering |
3. Add sitecore-rendering-host-name as a secret-provider parameter:
|
- | |
4. Add the new task to roles\sitecore-{topology}\tasks\main.yaml:
|
- name: Install external Rendering ingress service |
Enable the Rendering Host component
To enable the Horizon component:
-
In the Application repository, navigate to the roles\sitecore-{topology}\overlays\platform\kustomization.yaml file and enable Rendering with the components element, pointing to the Rendering module configuration scripts folder.
| components: - ../../bases/components/rendering |
Apply the changes
To apply the changes:
-
Apply the application changes to the environment with a pull request to the application repository.